


A New Era in Robotics!
Who’s ready to build a robot to withstand 2022? I am! We’ve finally completed all the parts needed to build your own heavy-duty robot around the 6.5″ Hub Motor with Encoder (aka “Hoverboard motors”). The hardware and control electronics are now within reach and you’re no longer relegated to an Amazon search for unknown electronics sources. All of these products are Made in the USA (except for the 6.5″ Hub Motor with Encoder) by Parallax, so they shall be warrantied and available for many years.
Unless you’ve seen Hoverboard motors up close, you may ask yourself “where’s the motor?” The wheel is the motor, like a brushless quadcopter outrunner motor. Depending on the voltage and current of your power supply, the 6.5″ Hub Motors will be very fast and very strong, capable of moving big loads across a huge space quickly (and potentially causing lots of damage if you are not careful).
Building a three-wheeled robot uses the following products from Parallax:
Control Electronics: Propeller 2 and Universal Motor Driver P2 Add-On Board
The P2 Universal Motor Driver Add-on Board requires a P2 Edge (or P2 Demo Board) plugged into a JonnyMac or Mini Breakout Board. The P2 Edge delivers the motor control signals. It requires one P2 Universal Motor Driver Add-on Board to control one 6.5″ Hub Motor or two of our traditional 12V Motor Mount and Wheel Kit motors.
The example source code is written in PASM/Spin2, and the P2 Edge provides the motor control signals to the P2 Universal Motor Driver Add-on Board. To start with this system, you’ll need to learn a little bit about the P2 and programming it. Our initial code examples create low-level control but will become easier to use. At this time, we haven’t provided a serial or I2C interface for other external controllers (Arduino, RPi, BASIC Stamp, etc.) but have planned that for the future.
You’ll need to provide the battery (12-36V), switches, fuses, and wires to connect the electronics in this system.
Build a Chassis of Your Own Design
Building a robot from these parts is an “a la carte” process; you’ll acquire the parts individually. We aren’t providing the robot chassis this time (remember the Arlo, or even the Microsoft Eddie?) because our community is practical and has access to laser cutters, routers, and powered hand tools.
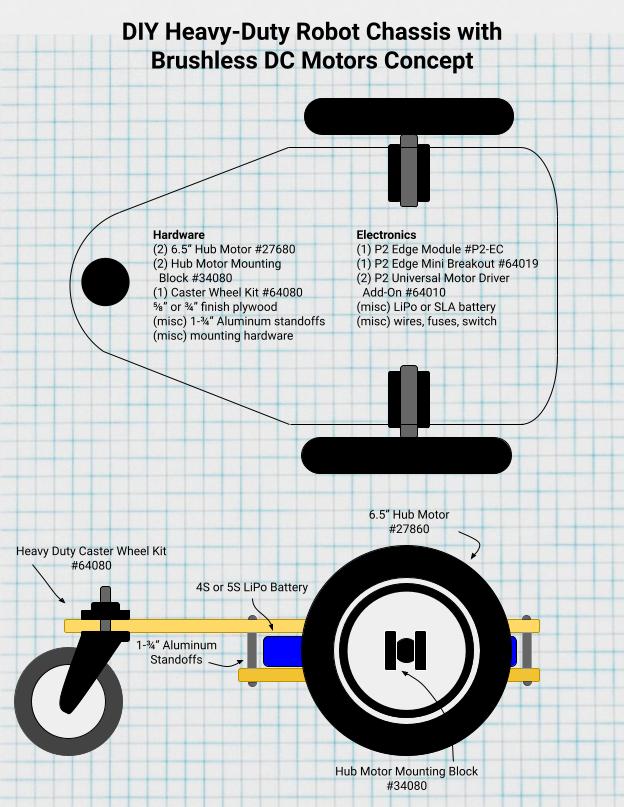
If you’re not sure how to make a chassis, the concept above provides an idea for a three-wheeled system built from plywood. Three-wheeled robots are quite versatile: they don’t get high-centered on floor transitions, they can turn away from obstacles without getting hooked on them, and they require only two motors.
The Hub Motor Mounting Block secures the 6.5″ Hub Motor’s shaft and provides a strong mounting attachment for a lower and upper deck, which could conveniently hold a LiPo battery in between. The Heavy Duty Caster Wheel Kit can also mount underneath the upper deck since the heights are equal. The control electronics could be mounted on the top.
Of course, our community will have much better ideas about this process and we look forward to seeing them!
Ken Gracey
Parallax Inc.